 简体中文
简体中文 English
 русский
 Español
Fubang is a professional manufacturer specializing in the design, production and sales of stainless steel chains.
Our A series short pitch precision roller chains comply with various international standards and are...
See DetailsContent
Conveyor chains are a critical link in your operation’s productivity. Its successful performance and longevity are not just determined by the quality of the chain itself, but by the diligence of the preparation before it’s even mounted. Rushing the installation process is a common and costly mistake, leading to immediate operational issues, premature wear, and unplanned downtime.
Before you even touch the chain, start with the paperwork and a visual inventory. This phase confirms you have the right components for the job.
1.1. Review the Chain Specification and Documentation
Check the Part Number: Compare the part number on the chain’s packaging or tag against your purchase order and equipment manual. A single digit’s difference can mean an incompatible chain.
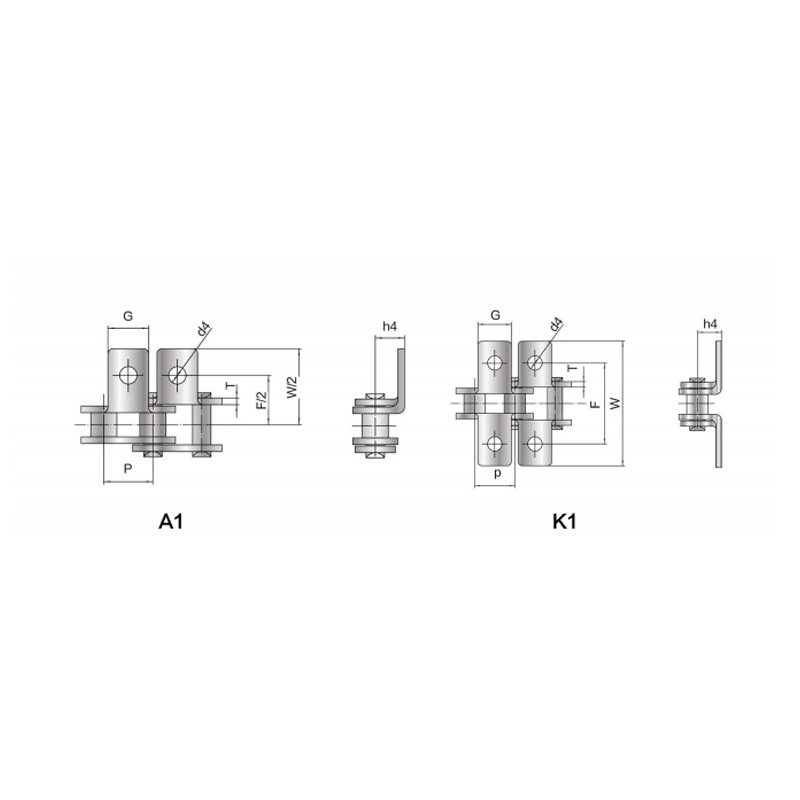
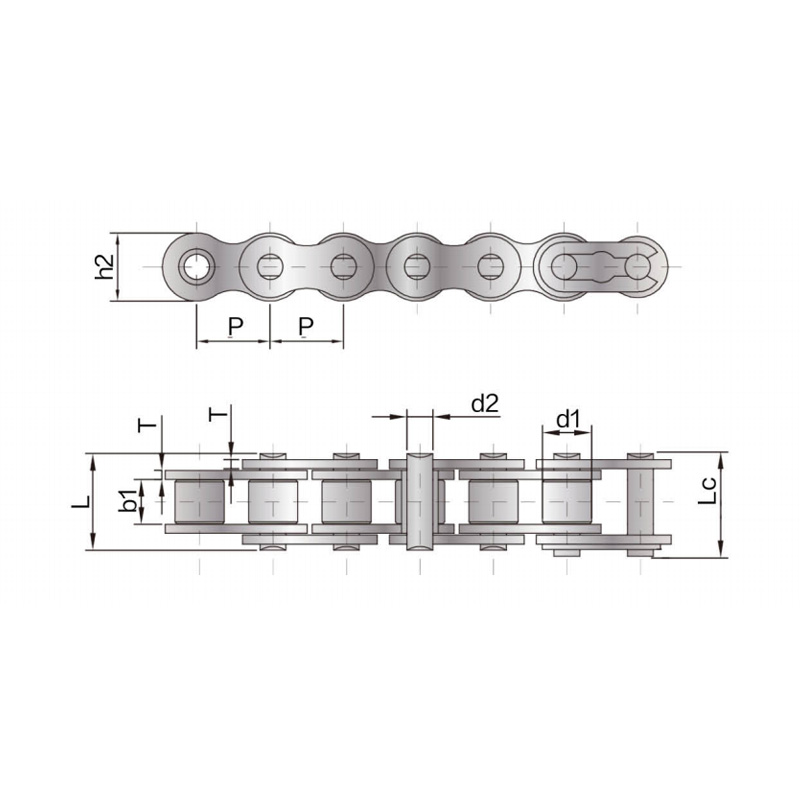
Understand the Specifications: Verify the chain’s key specifications: pitch (the distance between pins), inner width, and tensile strength. Ensure they match the design requirements of your conveyor system.
Inspect Documentation for Special Instructions: Some chains, especially those with special coatings (e.g., zinc, nickel) or pre-lubrication, may come with specific handling and installation instructions. Read these first.
1.2. Conduct a Visual Inspection of the Chain and Components
Look for Shipping Damage: Inspect the chain for any obvious physical damage incurred during transit, such as bent plates, nicked rollers, or damaged pins.
Check for Corrosion and Packaging Integrity: Ensure the chain is free from rust or corrosion. If it was shipped in a preservative oil, this is a good sign, but check that the packaging was intact and protected the chain from moisture.
Verify All Parts are Present: Ensure you have the correct number of chain strands, connecting links, offset links, and any other special attachments that were ordered.
A new chain should be installed into a clean, properly aligned, and well-maintained system. Installing a premium chain on a worn-out conveyor is a waste of resources.
2.1. Thoroughly Clean the Conveyor Framework
Remove Contaminants: Use scrapers, brushes, and degreasers to remove old grease, product dust, dirt, and any other debris from the conveyor frame, rails, and troughs.
Inspect for Obstructions: Look for and remove any burrs, sharp edges, or welded spatter on the framework that could gouge or interfere with the chain’s travel.
2.2. Inspect and Verify Sprocket Condition
Sprockets and chain are a matched set. A worn sprocket will rapidly destroy a new chain.
Check for Wear: Look for the classic “hook” shape on the sprocket teeth. A new sprocket tooth has a straight or slightly curved profile. A worn tooth will have a distinct hooked shape at the tip, indicating it is past its service life and must be replaced.
Verify Correct Sprocket Specification: Ensure the sprockets have the correct number of teeth and pitch diameter for the new chain.
Check Sprocket Alignment and Mounting: Confirm that the sprockets are securely mounted and that the drive and tail sprockets are correctly aligned both horizontally and vertically. Misalignment is a primary cause of uneven chain wear and premature failure.
2.3. Check Shafts, Bearings, and Seals
Inspect for Wear and Play: Manually check for any excessive play in the shaft bearings. A wobbly shaft will cause the sprocket to run eccentrically, creating a cyclic load and noise in the chain.
Verify Seal Integrity: Ensure that bearing seals are intact to prevent contamination and lubricant loss.
2.4. Inspect Guides and Wear Strips
Check for Wear and Level: Inspect all chain guides and wear strips. They should be secure and show a relatively even wear pattern. If they are severely worn or have developed grooves, they should be replaced or rotated to present a fresh, flat surface to the new chain.
Ensure Proper Clearance: Verify there is adequate clearance between the guides and the chain to prevent binding, but not so much that the chain can derail.
The chain has likely been coiled and packaged for some time. Proper preparation at this stage is crucial for a trouble-free installation.
3.1. Uncoil the Chain Correctly
Avoid Kinks and Twists: Never simply pull the end of the chain straight out of the shipping container. This will put a severe twist (kink) in the chain that can damage it and is extremely difficult to remove.
The Right Way: Lay the container on its side and roll the entire coil out onto the floor, like unspooling a garden hose. Alternatively, if the coil is standing upright, place your foot on the bottom of the coil and slowly pull the top loop up and away.
3.2. Pre-Stretch and Lubricate the Chain
What is Pre-Stretching? New chains often have a “settling-in” period where the initial wear between pins and bushings takes up internal clearances. This can cause the chain to elongate slightly after startup.
How to Do It: If possible, use a chain puller or a low-speed drive to run the chain (without load) for a short period before final tensioning. This allows the components to seat properly.
Apply Initial Lubrication: While some chains come pre-lubricated, it is often beneficial to apply a light coat of the lubricant you plan to use in service. This provides immediate protection during the critical first hours of operation. Ensure the lubricant is compatible with the chain’s material and your product.
Before physically pulling the chain into the system, perform these final checks.
4.1. Confirm the Chain Length and Direction
Lay it Out: If space allows, lay the chain out next to the conveyor path. This allows for a visual confirmation of length and helps identify any remaining twists.
Check for Directionality: Some chains with specific attachments (e.g., flights, paddles) are designed to run in one direction only. Ensure you are installing it with the correct orientation.
4.2. Gather the Right Tools and Equipment
Trying to improvise during installation leads to mistakes and safety hazards. Have on hand:
Proper Lifting Equipment: Chains are heavy. Use hoists, slings, or chain pullers to handle the weight safely.
Correct Tools: Have the right-sized wrenches, sockets, and torque wrenches for sprocket bolts and connecting links.
Personal Protective Equipment (PPE): Safety glasses and heavy-duty gloves are mandatory.
4.3. Perform a Final Safety Check
Lock Out, Tag Out (LOTO): Ensure the conveyor drive motor is completely isolated from power sources and locked out with clear tags indicating maintenance is in progress.
Clear the Area: Ensure the work area is clear of tools, debris, and unauthorized personnel.
Mounting a conveyor chain is more than a mechanical task; it is a process that sets the stage for months or years of reliable operation. The pre-installation checks outlined here—from verifying paperwork and inspecting sprockets to properly preparing the chain and system—are not optional extras. They are a fundamental part of a proactive maintenance strategy.
Investing time in these meticulous preparations prevents the far greater costs of unexpected downtime, damaged products, and premature chain failure. By treating the installation process with the care and attention it deserves, you ensure that your conveyor chain operates smoothly, efficiently, and reliably from its very first revolution.
Our A series short pitch precision roller chains comply with various international standards and are...
See Details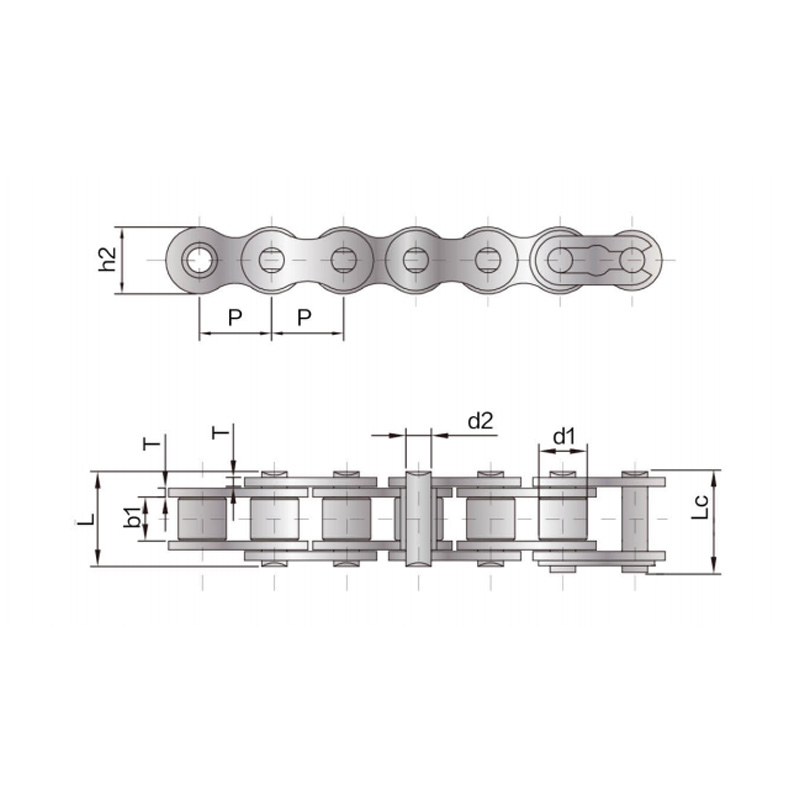
The tensile strength and fatigue strength of the B series short pitch precision roller chain reach 1...
See Details
The Heavy-duty precision roller chain adopts a thickened chain plate design based on the short-pitch...
See Details
The double pitch driving chain complies with various international standards. The pitch of the doubl...
See Details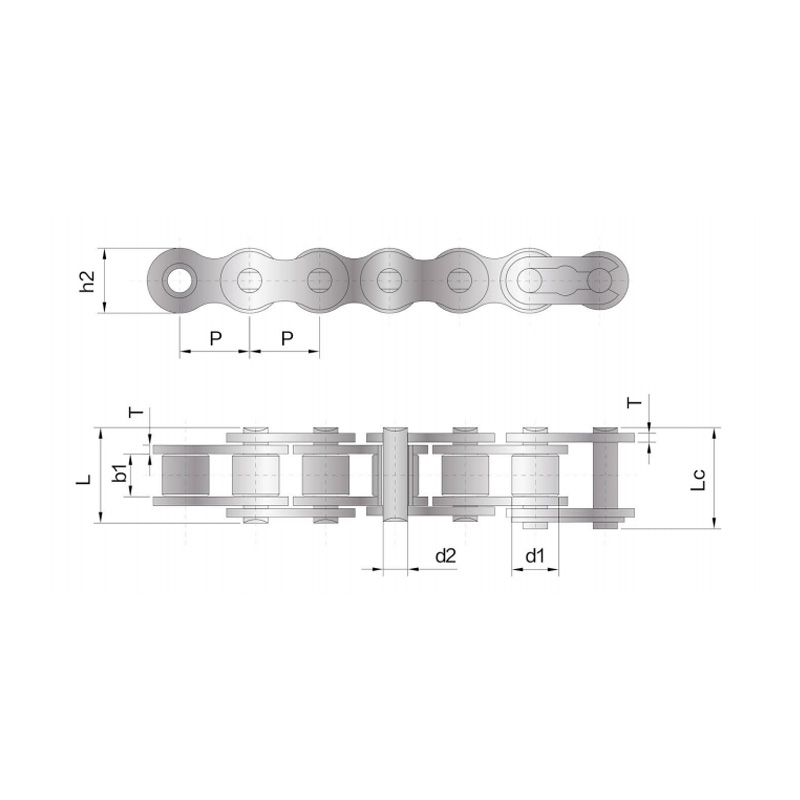
We also produce single row roller drive chains in more sizes and varieties. Customised products, sui...
See Details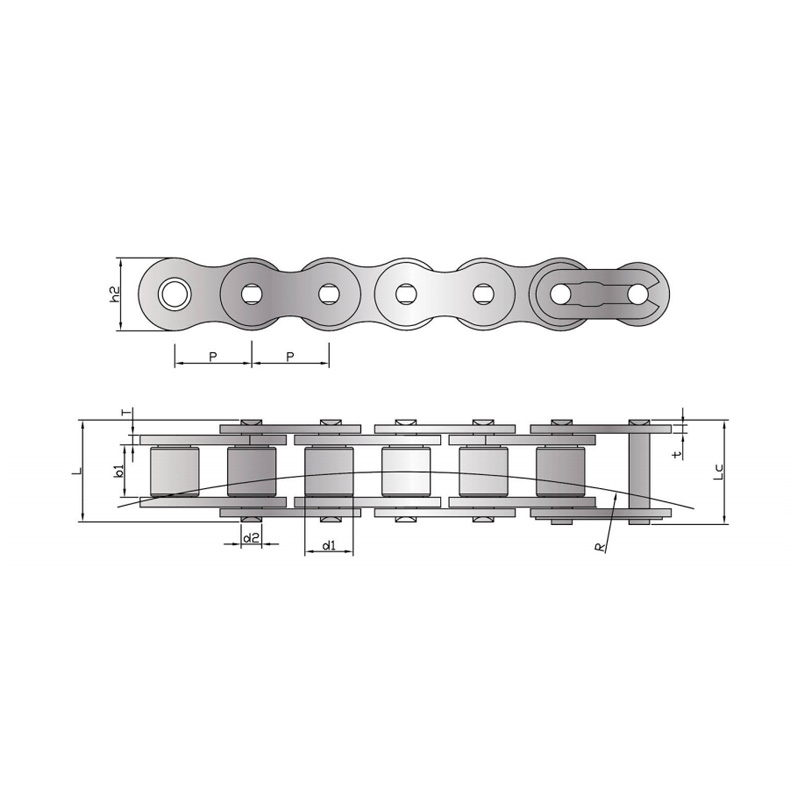
Side bow chain refers to changing the size of parts in the design of short-pitch precision roller ch...
See Details
The Anti-Sidebow chain for pushing window is a functional product with specially designed parts and ...
See Details
The A series short-pitch straight plate precision roller chain has a smaller pitch, a relatively lar...
See Details© Suzhou Fubang Machinery Chain Transmission Manufacturing Co., Ltd. Stainless Steel Roller Chains Manufacturers Conveyor Chains Suppliers
